Announcement

Collapse
No announcement yet.

An Introduction to Making Cheese

Collapse
X
 
  • Filter
  • Time
  • Show
Clear All
new posts

  • An Introduction to Making Cheese

    How is Cheese Produced from Milk?

    Making cheese is a simple process of talking fresh milk, (as fresh as possible) warming it to a given temperature, and allowing or encouraging the milk to acidify either naturally or by introducing an acid or, a specially prepared cheese culture or bacteria. Then the milk is warmed to encourage the growth of those bacteria until they multiply sufficiently to acidity the milk.

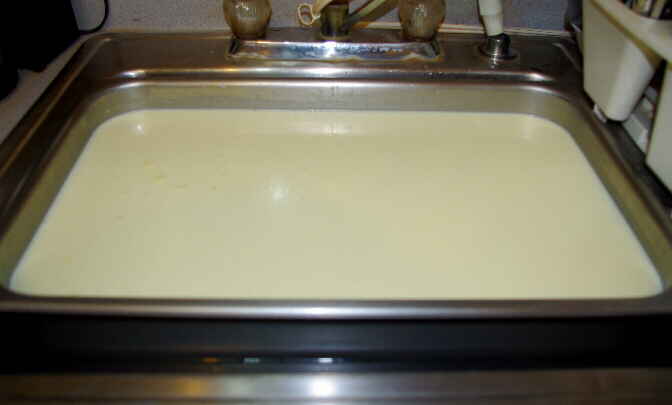
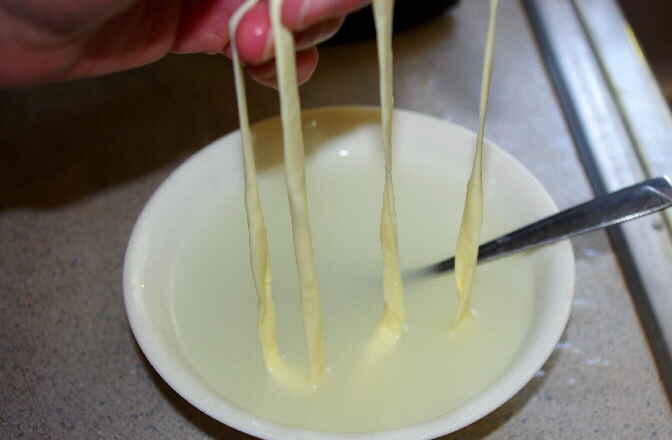
    Once the right amount of acidity is reached the proteins in the milk will coagulate to form a thick gel. This gel is the early stage of the curd. The fat and water within the milk is then trapped with that gel through the growth of the bacteria generally lactic acid bacteria or LAB.

    In the next phase you would add a coagulation medium usually rennet to further solidify the milk. The level of acidity of the milk will determine when the rennet is to be added. This will begin the coagulation process. In general the pH levels should be between 4.5 and 6. A pH meter can be purchased from cheese suppliers for as little as $30 or for a lab quality unit in the thousands. To get started you will not need one but it is highly recommended for the more advances cheeses as a method to control the consistency of your cheeses - so keep it in mind.

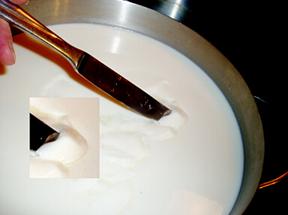
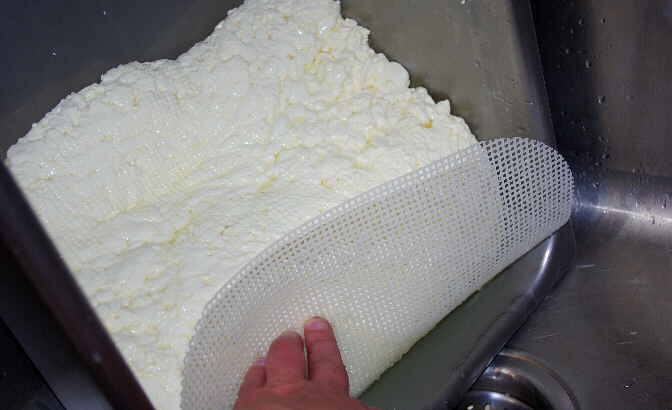
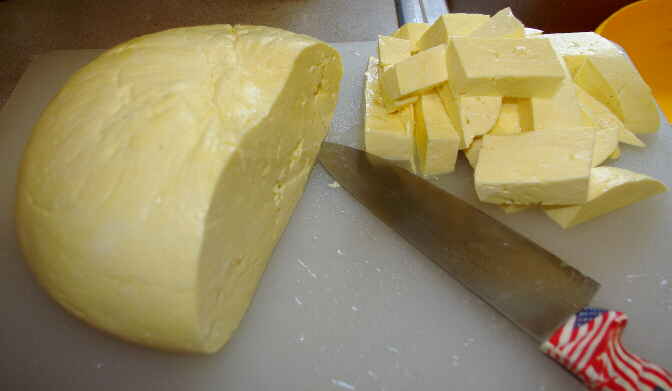
    Once the coagulation is complete you need to separate the solids, known as curds from, the liquids which are called whey by cutting the curds to a size determined by the style of cheese you are making. The cutting of the curds can be done with a simple long bladed knife or spatula. Nothing elaborate is needed here. Care should be taken to cut the curds as evenly as possible so that they are approximately the same size.

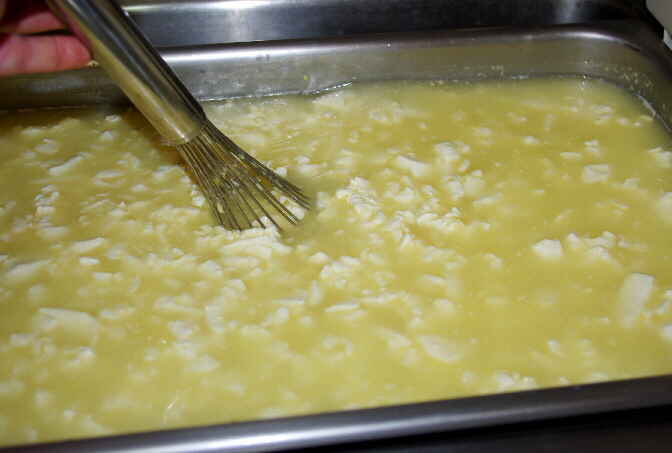
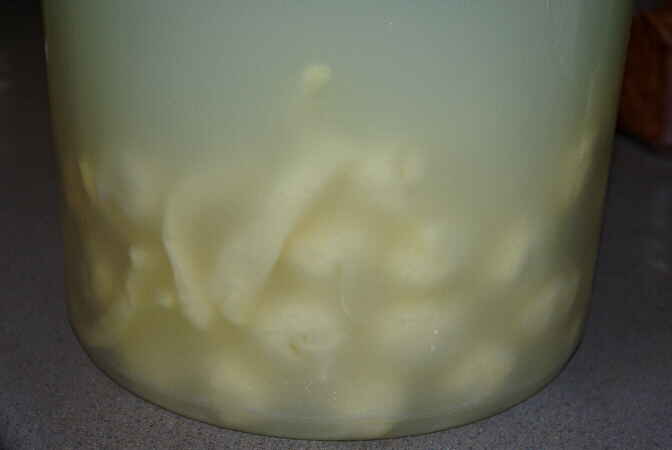
    Once the curds are cut the whey will begin to release whey and form curds. The curds being heavier than the whey will sink to the bottom of the pot. After the initial cutting of the curds they should be left undisturbed for a brief rest, this is known as healing the curds. Healing is used to give the delicate curds time to firm and form a film around them to protect them from losing their fats during the heating and stirring process.

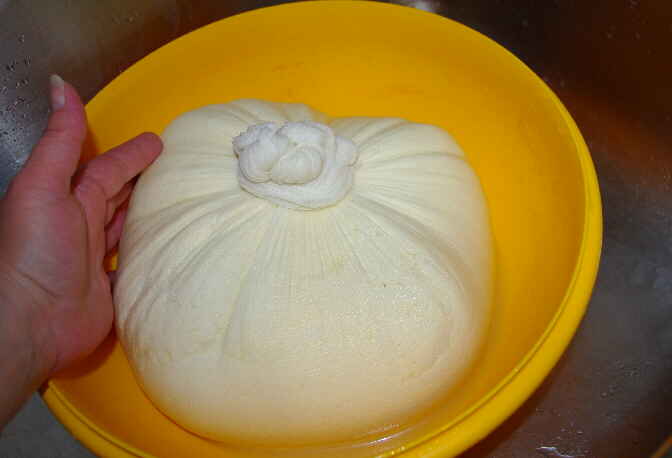
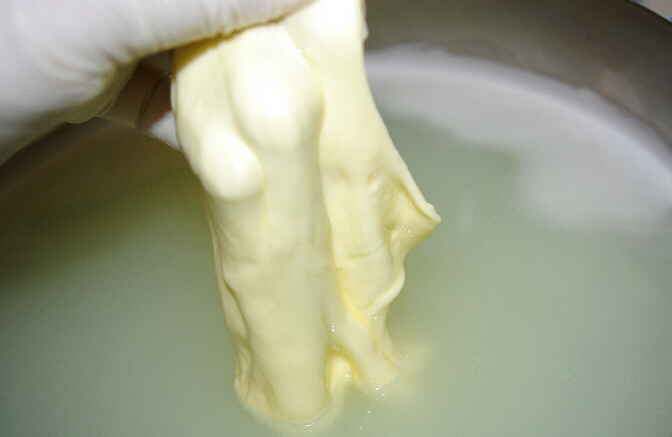
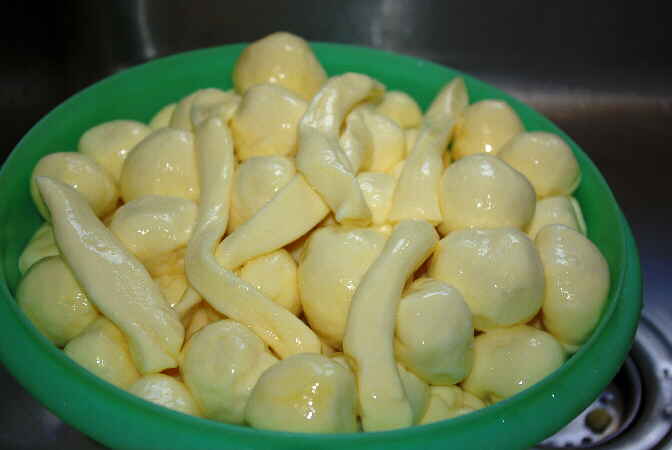
    Once healed the curds are gently stirred and heated until the desired level of firmness has been achieved, the curds are collected, drained and pressed together to form a semi solid block which we all know as cheese.
    Proper acid development plays a critical role in the making of cheese. Not enough acidity will give you soft, mushy, cheese which will weep whey weeks after pressing. Too much acidity will cause the cheese to hold on to the whey for several days which can sour the cheese.

    If this didn’t make sense to you do not worry. After making a few basic cheeses we will review the process and hopefully clear up anything that doesn’t seem clear right now.
    Smokers:
    ECB -The Brinkman All-In-One Bullet type Water smoker aka -Baby Bink)Camp Chef Smoke Vault 24 Inch propane smoke (aka -Black Beauty)
    SunJoy horizontal with left side firebox (aka - Lefty Lucy)
    River Grille - Black Ceramic Egg (aka Black Egg)

    Smoke preference:Combination of Charcoal, Hickory, Apple, Cherry & Pecan wood.

  • #2
    Factors That Determine What Type of Cheese You Make

    Factors That Determine What Type of Cheese You Make
    The type, texture and flavor of cheese that you make are determined by the following factors:
    1) The type of milk you use – (cows, goats, buffalo, sheep, etc. ) Different types of milk and combinations of milk will have a big effect on the flavor of your cheese.

    2) The type of culture or cultures used to acidify the milk. The same cultures can be used for making several styles of cheese. These will be discussed in detail later.

    3) How long the milk is left to acidify. This is based on the style of cheese you are making. The acidity will affect the final flavor, texture and moisture of the cheese

    4) The type rennet used. As mentioned earlier this can be animal or vegetable, liquid or solid.

    5) Temperature

    a. the temperature of the milk when you add the cultures

    b. the temperature of the milk when you add the rennet

    c. The cooking temperature of the milk and the curds. A higher temperature will produce finer curds and the finer the curds make it harder to drain whey from the curds.

    6) The length of time the curds are cooked. Some cheeses require soft delicate curds and some require firm rubbery curds. The longer the curds are cooked the firmer they become.

    7) The size of the curds when they are cut. The larger the surface area of the curds the easier it is to drain the whey from the curds.

    8) The firmness of the cheese when the curds are pressed. Soft cheese requires little or no pressure hard cheese require a great deal more pressure when being formed.

    9) The ripening method used for the cheese

    a. Ripening or aging time, some cheese mature within a few weeks while others require months or years to age to perfection.

    b. The ripening temperature – most cheese need to ripen or age at 45-55°F (7-12°C).

    c. The humidity levels while the cheese is ripening – somewhere between 65 and 95%.
    Smokers:
    ECB -The Brinkman All-In-One Bullet type Water smoker aka -Baby Bink)Camp Chef Smoke Vault 24 Inch propane smoke (aka -Black Beauty)
    SunJoy horizontal with left side firebox (aka - Lefty Lucy)
    River Grille - Black Ceramic Egg (aka Black Egg)

    Smoke preference:Combination of Charcoal, Hickory, Apple, Cherry & Pecan wood.

    Comment


    • #3
      Equipment Needed to Make Basic Cheese

      The beginning recipes in I will post are designed using one gallon of milk at a time, which will fit nicely into a 5 quart or larger stainless steel, glass or Pyrex pot. You cannot use aluminum pans for making cheese.
      These cheeses do not require fancy equipment, cultures or presses. They are designed as building blocks to your cheesemaking hobby to slowly build one upon the other as you build confidence in your newly developed skills. The equipment you will need is as follows:

      A THERMOMETER which reads at least from 0 to 250°F (0 to 121°C). This can be digital or a dial type – it doesn’t matter. What matters is that it works correctly. It is best to get a thermometer that can be calibrated. Dial thermometers will usually have a small nut on the back of the dial for this purpose. Digital thermometers are a bit harder to tell by just looking you’ll have to read the package. Do not boil or submerge the thermometers! Wash carefully by hand and only submerge probes in boiling water and sanitizer.

      CHEESE CLOTH – Cheese cloth, Butter Muslin, cotton tea towels or large cotton handkerchiefs used to drain the whet from the curds may be used and can be washed and reused.

      COLANDER – a large stainless steel or plastic colander lined with cloth for draining curds.

      STAINLESS STEEL POT - A thick bottomed stainless steel pot large enough to hold 1 or 2 gallons of milk. Do not use aluminum as the acids from the cheese will eat away at the aluminum and leach into your cheese. Enamel pots may be used ONLY if there are no chips or cracks in the enamel in the pot. It is best to stick with non-reactive pots like Stainless Steel. Thick bottomed pots are encouraged as they distribute the heat more uniformly.
      If you have two pots where one will fit into the other (like a double boiler) this will prevent accidental scalding of the milk and make it easier to control temperature. If not a single pot will do.

      MEASURING TOOLS – You will need glass, plastic or stainless steel measuring spoons, and measuring cups to measure ingredients.

      SANITIZER – there are many sanitizers on the market. If you are allergic to iodine or shell fish read the ingredients carefully. Many contain iodine! All tools and equipment need to be washed thoroughly sterilized and sanitized before use. Keep a small container of sanitizer handy when making cheese to so you can rinse then sanitize each tool between each use.

      Cheese Moulds or Hoops

      Cheese Moulds are the forms used to drain and form the cheese. They are often referred to as cheese hoops. The proper use of the words mold and mould has been debated for years. Which to use can also depend on what country you live in. It can be confusing so for the sake of clarity I will use mold for the white and green/blue cheese molds or spores and mould for the cheese forms or hoops. Generally speaking there are several types of mold spores and they will be referred to by name so it shouldn’t be too confusing.

      Moulds used for pressing cheese must to be able to withstand the pressure of the cheese being forced down into it and for some cheeses like cheddar that pressure can be extremely high. They will also need followers which are closely fitted tops that slide down into the mould to press on or to keep the cheese inside the hoop while being pressed. These are generally called mould followers or just simply followers.

      Cheese moulds come in many shapes and sizes and simple molds can be made at home from food grade small baskets or food grade plastic tubes drilled with drain holes. Mould followers needed for pressing cheeses can be cut from small inexpensive cutting boards purchased from the Dollar store. Here are a few different commercially available moulds or hoops used for making cheese.

      A Stove or heat source
      When heating you milk a stove is normally used. You may want to do a test run using a pot filled with water to get a feel for the fine control needed for making cheese. You don’t want to over shoot temperatures by more than a degree or two when making cheese. It may change the texture and moisture content of your cheese. It will still be edible just drier and more crumbly.
      For lower Mesophilic (low temperature) cheeses the pot may be heated in the sink using hot tap water. This may be an easier method to control temperatures than using the stove especially if using an electric stove.
      Smokers:
      ECB -The Brinkman All-In-One Bullet type Water smoker aka -Baby Bink)Camp Chef Smoke Vault 24 Inch propane smoke (aka -Black Beauty)
      SunJoy horizontal with left side firebox (aka - Lefty Lucy)
      River Grille - Black Ceramic Egg (aka Black Egg)

      Smoke preference:Combination of Charcoal, Hickory, Apple, Cherry & Pecan wood.

      Comment


      • #4
        Home Made Starter Cultures

        Starter cultures are used to convert the lactose in the milk to lactic acid. This is needed to achieve the correct pH for coagulation and determine the taste, texture and moistness of the cheese.

        There are two basic types of starter cultures Mesophilic and Thermophilic.

        MESOPHILIC - from the Greek word Meso - which means intermediate and philic - which means loving. These cultures thrive at room temperature.
        And
        THERMOPHILIC - from the Greek word thermo - meaning heat and philic - which means loving. These cultures require higher temperatures to become most active.

        Simple Mesophilic and Thermophilic cultures can be made at home. Various commercially produced cultures are also available for making different more complex cheeses. For the most basic cheeses in the beginning cheese making section of the book we will be making our own home made variety of starter cultures.

        NOTE: Whenever you see a recipe that lists as an ingredient: buttermilk or yogurt it is more often than not referring to the home made culture not the off the shelf product itself.

        Making a Home Made Mesophilic Starter Culture

        1. Start with 2 cups of fresh or Cultured Buttermilk.
        .
        2. Let the buttermilk reach room temp. 70°F (21°C).
        .
        3. Allow the buttermilk to ripen for 6 - 8 hours. (Commercial buttermilk does not have a high enough concentration of bacteria to serve as a starter culture without ripening first to increase the bacterial counts.)
        .
        4. The resulting buttermilk will be much thicker and sour than what you started with. It should be the consistency of fresh yogurt, if it isn’t let it sit for a few more hours. This will be your home made Mesophilic starter culture.
        .
        5. Pour your new culture into a full sized sterile ice cube tray and put it into your freezer.
        .
        6. Once the cubes are frozen, remove the cubes from the trays and put them into a sterile sealed container or plastic freezer bag. Label the package with the type of culture (Mesophilic) and the date when it was made. You will not be able to tell them apart from the Thermophilic culture you will make later so don’t skip this step.
        .
        7. Each one of the ice cubes will equal about 1 ounce of Mesophilic starter culture and can be thawed and used in your cheese recipes. The cubes will keep for about one month. Longer if vacuum sealed.

        8. When you see you are running low on starter to make more starter simply thaw one cube and add it to 2 cups of fresh milk and follow the instructions just as though you were using buttermilk. It’s that Easy.

        NOTE: Due to the different types and sizes of ice cube trays available today we will define usage as 3 tablespoons of starter to 1 gallon of milk. To insure you are using the correct amount of starter measure the capacity of your ice cube trays prior to freezing and adjust usage accordingly.
        Smokers:
        ECB -The Brinkman All-In-One Bullet type Water smoker aka -Baby Bink)Camp Chef Smoke Vault 24 Inch propane smoke (aka -Black Beauty)
        SunJoy horizontal with left side firebox (aka - Lefty Lucy)
        River Grille - Black Ceramic Egg (aka Black Egg)

        Smoke preference:Combination of Charcoal, Hickory, Apple, Cherry & Pecan wood.

        Comment


        • #5
          Home Made Starter Cultures

          Making a Home Made Thermophilic Starter Culture

          1. Start with 2 cups of fresh milk. Heat it to 185°F (85°C.) Be careful not over heat the milk or the cream will separate.

          2. Let the 2 Cups of milk cool down to at least 125°F (52°C) at room temperature.

          3. Add one heaping tablespoon of fresh plain yogurt (either homemade or store bought. If using commercially prepared yogurt it must be labeled with “live and active cultures.” (I have used Dannon with good results).

          4. Mix the yogurt into the milk thoroughly with a fork or a whisk.

          5. Keep the mixture warm at about 110°F (44°C) for 8 -10 hours until a firm yogurt has set. This can be done by using a double boiler on a low setting or by placing the inoculated milk into a small sterile mason jar placed in a warm water bath. A heating pad set at warm will work nicely for this.

          6. This mixture will look just like a thick yogurt when ready. This will be your home made thermophilic starter culture.

          7. Pour this culture into a full sized sterile ice cube tray and put into your freezer.

          8. Once the cubes are frozen, remove the cubes from the trays and put them into a sterile sealed container or plastic freezer bag. Label the package with the type of culture (Thermophilic) and the date when it was made. You will not be able to tell them apart from the Mesophilic cultures you made earlier so don’t skip this step.

          9. Each one of the ice cubes will equal about 1 ounce of thermophilic starter culture and can be thawed and used in your cheese recipes. The cubes will keep for about one month. Longer if vacuum sealed.

          10. When you see you are running low on starter to make more starter simply thaw one cube and add it to 2 cups of fresh milk and follow the instructions just as though you were using yogurt.

          NOTE: Due to the different types and sizes of ice cube trays available today we will define usage as 3 tablespoons of starter to 1 gallon of milk. To insure you are using the correct amount of starter measure the capacity of your ice cube trays prior to freezing and adjust usage accordingly.
          Smokers:
          ECB -The Brinkman All-In-One Bullet type Water smoker aka -Baby Bink)Camp Chef Smoke Vault 24 Inch propane smoke (aka -Black Beauty)
          SunJoy horizontal with left side firebox (aka - Lefty Lucy)
          River Grille - Black Ceramic Egg (aka Black Egg)

          Smoke preference:Combination of Charcoal, Hickory, Apple, Cherry & Pecan wood.

          Comment


          • #6
            Home Made Starter Cultures

            Raw Milk Clabber (Mesophilic Culture)

            If you’re lucky enough to have your own cow or just have access to raw non-pasteurized, non-homogenized milk you can make clabber. This will not work with pasteurized, homogenized milk!

            1. Take some fresh raw milk and place it in a sterile mason jar.

            2. Fasten a paper towel or handkerchief to the top of the jar to prevent contamination, but allow the clabber to breathe.

            3. Let the jar sit undisturbed, at room temperature for a few days.

            4. After a few days you will have something that resembles a thick springy yogurt and smells like cultured buttermilk. This can be used to make any of the cheeses that call for Mesophilic culture.

            5. When you see you are running low use the last few tablespoons to make the next batch.
            Smokers:
            ECB -The Brinkman All-In-One Bullet type Water smoker aka -Baby Bink)Camp Chef Smoke Vault 24 Inch propane smoke (aka -Black Beauty)
            SunJoy horizontal with left side firebox (aka - Lefty Lucy)
            River Grille - Black Ceramic Egg (aka Black Egg)

            Smoke preference:Combination of Charcoal, Hickory, Apple, Cherry & Pecan wood.

            Comment


            • #7
              Rennet

              Rennet – (also called rennin or chymosin)

              Rennet is a proteolytic enzyme that was first produced from the stomach lining of a young cow, sheep or goat. In ancient days animal stomachs were used as vessels to carry water, wine or milk. It was soon discovered that day old milk left in these vessels would curdle and separate into solids (curds) and a watery liquid (whey). These chunks were similar to cottage cheese but were the foundation of learning how to preserve milk in the form we now call cheese.
              There are many types of rennet available to the home cheesemaker. Rennets may be purchased in liquid, powder or tablet form. Rennets may also be purchased in animal or vegetable form.

              Animal rennets - are used more commonly and come from calves, goats and sheep or a combination of two of the three. It is generally best to use the type that matches the cheese you are making and the milk you are using. For example goat rennet for a goats milk cheese, calves rennet for a cow’s milk cheese or sheep’s rennet for a ewe’s milk cheese. Sometimes a different rennet will be used to achieve a slightly different profile – this is not a hard fast rule.

              Vegetable rennet - is becoming more popular due to the increase in vegetarian and vegan consumers in the market place. Vegetable rennet is often referred to as microbial rennet. It is made from the microorganism Mucor miehei. One of the sources for vegetable rennet is the thistle plant.

              Junket Rennet – Junket rennet is available in table form. They come sealed in foil and may last for several years without losing potency. They are manufactured for making custards and puddings but can be used for making cheese although the curd set with be somewhat softer. This can often be found in the pudding section of grocery stores.

              NOTE: All ingredients should be used according to the manufacturer or suppliers instructions or recommendations, not based on a recipe. Their use may vary considerably from one source to another. Recipes are used as a guide only to get you started. As you gain experience you will learn how to make adjustments to the ingredients, to make each recipe or own.
              There is more than one way to make anything – this is my way.
              Are you ready? If this is your first cheesemaking book you probably have none of the equipment needed to make many varieties cheese. That’s okay. This book builds one step at a time starting from zero experience and no equipment to some seriously aged imported styled cheeses.

              Some rennets can be purchased locally at hardware stores or pharmacys. A good commercial cheese rennet can be purchased here:

              http://www.dairyconnection.com/
              http://www.danlac.com/
              http://glengarrycheesemaking.on.ca/
              Last edited by DeejayDebi; 05-17-2011, 10:29 PM.
              Smokers:
              ECB -The Brinkman All-In-One Bullet type Water smoker aka -Baby Bink)Camp Chef Smoke Vault 24 Inch propane smoke (aka -Black Beauty)
              SunJoy horizontal with left side firebox (aka - Lefty Lucy)
              River Grille - Black Ceramic Egg (aka Black Egg)

              Smoke preference:Combination of Charcoal, Hickory, Apple, Cherry & Pecan wood.

              Comment


              • #8
                are you planning on reproducing the entire text of whatever cheese making book you're using ?

                If so can we have the pictures as well :-)

                I've got a couple of cheese making books (the one most of us have - and quite possbly the one you're copying: home cheese making by ricki carroll) and one on the kindle. The pictures really help

                If you're actualy typing this from scratch, I apologise. But It all looks very familiar.
                Made In England - Fine Tuned By The USA
                Just call me 'One Grind'


                Comment


                • #9
                  Thanks Debi!
                  Somehow missed this when you posted it.

                  Lotta great info. Saved and bookmarked
                  There is a cure...http://phoenixtears.ca/

                  sigpic

                  Comment


                  • #10
                    Originally posted by curious aardvark View Post
                    are you planning on reproducing the entire text of whatever cheese making book you're using ?

                    If so can we have the pictures as well :-)

                    I've got a couple of cheese making books (the one most of us have - and quite possbly the one you're copying: home cheese making by ricki carroll) and one on the kindle. The pictures really help

                    If you're actualy typing this from scratch, I apologise. But It all looks very familiar.
                    Actually no I am copying from my own Cheese Book as I mentioned in the begining. I've spent over a year putting it together and I am not done yet. I though a few basic concepts would be a good place to start so you know why you are doing these things. I sure hope it looks familuar at least you haven't wasted your money something stuck. Basics are basics, we all say the same thing just a little diferently. I will add pictures with the makes. That will let you see what all this really means. For now I really don't know what anyone knows and I have to assume some know nothing at all might might want to learn, so if some of this is familuar good for you! You are a head of the class! For the newbies I think we still need to define some terms ....
                    Last edited by DeejayDebi; 05-19-2011, 09:56 PM.
                    Smokers:
                    ECB -The Brinkman All-In-One Bullet type Water smoker aka -Baby Bink)Camp Chef Smoke Vault 24 Inch propane smoke (aka -Black Beauty)
                    SunJoy horizontal with left side firebox (aka - Lefty Lucy)
                    River Grille - Black Ceramic Egg (aka Black Egg)

                    Smoke preference:Combination of Charcoal, Hickory, Apple, Cherry & Pecan wood.

                    Comment


                    • #11
                      Defining Some Terms

                      CHEESE - a solid food made from the milk of cows, goats, sheep, and/or other mammals. Cheese is made by curdling milk through the use of vinegar, lemons, rennet, (or rennet substitutes and acidification.

                      MILK - Cheeses can be made from the milk of cows, goats, buffalo, sheep, horses and even reindeer but is most commonly made from cows, goats and buffalos milk in the US. Milk should be a fresh as possible when making cheese. It can be made from fresh raw milk or commercial pasteurized milk, but it cannot be made from Ultra High Temperature pasteurized milk.

                      ULTRA HIGH TEMPERATURE (UHT) pasteurized milk or cream will not make cheese. I have found out recently that the label does not have to say the milk is UHT pasteurized but you can check the expiration dates. Normally pasteurized milk will expire within a few days. UHT will expire in several weeks. Some say indefinitely. UHT pasteurized milk may also be labeled as ESL – extended shelf life. Avoid it when making cheese. If you buy a particular brand of milk that does not seem to coagulate – try a different brand. It could be a UHT that is not labeled.

                      CURDS - are formed by coagulating milk then draining off the liquid. Curds start out as a soft yogurt- like substance and become more firm and eventually cheese like with time. Curds are often referred to as green cheese.

                      The curds can be enjoyed as is, breaded and fried or formed into various shapes and pressed to make cheese.

                      WHEY - is the liquid remaining after milk has been curdled and solidified. Whey can be used to produce ricotta, Gjetost and other whey type cheeses or used in many other ways. It can also be added to breads and pastry recipes in place of water, fed to animals or used in your garden.


                      ACIDIFICATION - is traditionally considered any chemical compound that, when dissolved in water, gives a solution with a pH less than 7.0. Don’t worry if you failed Chemistry it’s not really needed here but can be helpful if you really want to understand the process. Simply put acidification or ripening is just souring the milk to prepare it for making cheese. This is usually done by adding lactic acid bacteria (LAB) or starter culture. This is sometimes referred to as inoculating the milk.

                      COAGULATION - the process of changing a liquid, (in this case milk), into a thickened curd. This is also called curdling, which is what makes the liquid milk become a solid - cheese. Milk can be coagulated using one of two methods;

                      ACID COAGULATION – using acidic substances such as lemon juice or vinegar or commercially available bacterial cultures which will turn the lactose (milk sugar) into lactic acid.
                      Or
                      RENNET COAGULATION – Using animal or vegetable based rennet.

                      RENNET - There are animal, vegetable and microbial based rennets available. They come in liquid, powder and tablet form. They will all coagulate the milk. Always use the recommended dosage printed on the package by the manufacturer rather than that listed by a recipe. Rennet should always be dissolved thoroughly in pure un-chlorinated water.

                      ANIMAL RENNET - enzymes produced in the stomach lining of any mammal to digest the mother's milk. Rennet contains a proteolytic enzyme (protease) that coagulates the milk, causing it to separate into solids (curds) and liquid (whey). The active enzyme in rennet is called rennin or chymosin but there are also other important enzymes in it such as pepsin or lipase.
                      VEGETABLE RENNET - made from the thistle family of plants. They are often used for produce kosher and vegetarian cheeses. Rennet has also successfully been produced from certain figs.
                      MICROBIAL RENNET - A rennet of bacterial origin, called microbial coagulant, is made from Mucor miehei. This rennet is usually found in tablet form and is often used to make cheese appealing to vegetarians.
                      NOTE: Many of the basic cheeses can be made with Junket® Rennet which can be found in the pudding section of most grocery stores! I have used Junket Rennet tablets for years and they do work contrary to what you may read on the internet.

                      PH – pH is a measure of the activity of hydrogen ions. It is measured using a pH meter. Acids release hydrogen therefore by measuring the pH we know how acidic the whey is during our cheese process. Tracking pH can make it much easier to determine when to proceed to the next step in your cheese making process.

                      CLEAN BREAK - Once the milk has been inoculated and rennet added it will coagulate or thicken into something looking very much like plain yogurt (which by the way is sometimes considered a cheese).

                      A clean break is when you can insert a clean knife or bent finger into the coagulated milk and lift it up and out cleanly. It will at first look like a pudding trying to stick to your finger then it will just fall away cleanly leaving a small puddle of whey where the curds were. In the picture I used a knife to make it easier for you to see.


                      STARTER CULTURES – Cheese cultures are used to acidify the milk. There are several varieties of cultures which react differently with milk to acidity and adjust the ph.
                      There are two basic types of Starter Cultures:

                      MESOPHILIC CULTURES - These are used for most soft cheeses and many hard cheeses that are not heated over 102°F (39°C). The word 'Meso' means middle and these cultures are used for cheeses where the recipe requires temperatures between 68 and 102°F (20 and 39°C).
                      And
                      THERMOPHILIC CULTURES – These are 'heat loving' and these will do best for the higher temperature cheeses that require heating to 104 -128°F (40 - 54°C).

                      Starter cultures can be as simple as a using spoon full of plain yogurt or butter milk, or be so complicated as to require special laboratories to grow and package depending on the types of cheeses and milk you are using. We will get into this in more detail later.

                      CALCIUM CHLORIDE – This is used to improve curd size and texture when using commercially available pasteurized homogenized milk.

                      ACIDIC ACID – Simple white Vinegar, lemon, lime or orange juice.

                      CITRIC ACID - Used to increase acidity when necessary for certain types of cheeses.
                      NOTE: Do not confuse this with ascorbic acid they are not the same and cannot be substituted one for the other.

                      TARTARIC ACID - Is used with light cream to make fresh mascarpone desert cheeses.

                      FLAKED CHEESE SALT – Is a specialty grade, additive free pure salt for seasoning cheese. It enhances the flavor and inhibits spoilage.

                      CHEESE SALT – the best salts for making cheese are sea salt, kosher salt and pickling salt. Do not use an iodized salt as it will affect the ripening of the cheese.

                      LIPASE – is an enzyme used to enhance the flavor of Italian and Spanish specialty type cheeses. It comes in several varieties such as kid, calf and lamb and combinations of each to produce the traditional "Old World" flavors of European cheeses. This enzyme is a "must" making some cheeses like Feta, Romano, Pecorino, Manchego and Parmesan.

                      MOLDS – There are a few types of molds used in cheese making. White, and green/blue molds.

                      PENICILLIUM CANDIDUM - the white mold. These are freeze-dried mold spores for use in surface ripened cheeses such as Brie, Camembert, Colomiers, Saint Maure, etc. They produce a creamy white appearance and velvety texture. It comes in two varieties:
                      VS – Is mild flavored for use with cow’s milk cheeses.
                      NEIGE – which is stronger flavored – for use with goats milk cheeses.

                      PENICILLIUM ROQUEFORTI - a very fast growing blue-green mold culture. It produces an intense dark blue-green marbled interior with a piquant aroma and creamy texture. Use for blue mold cheese such as Blue, Roquefort and Gorgonzola.

                      BREVIBACTERIUM LINENS - Used for the production of an orange/red surface color formation on cheese. Produces a characteristic "sulfur" aroma associated with washed rind and smear cheeses like Muenster, brick and limburger. There are two types:
                      LR - Brevibacterium linens standard
                      SR3 - Less aromatic than LR

                      GEOTRICHUM CANDIDUM – This is used in conjunction with other molds. Grows rapidly on cheese surface first and aids in the formation of Penicillium Candidum and Brevibacterium linens. It will produce a thick, velvety surface to really give your other molds a foothold. There are three types:
                      GEO 17 - Mold like appearance - Very mild flavor and aroma
                      GEO 15 - Yeast like appearance - Mild flavor and aroma
                      GEO 13 - Mold like appearance - Intermediate flavor and aroma


                      BTW - Ricki Carrol borrowed this section from me for her blog ...
                      Click Here
                      Smokers:
                      ECB -The Brinkman All-In-One Bullet type Water smoker aka -Baby Bink)Camp Chef Smoke Vault 24 Inch propane smoke (aka -Black Beauty)
                      SunJoy horizontal with left side firebox (aka - Lefty Lucy)
                      River Grille - Black Ceramic Egg (aka Black Egg)

                      Smoke preference:Combination of Charcoal, Hickory, Apple, Cherry & Pecan wood.

                      Comment


                      • #12
                        Preparation to Making You First Cheese

                        STEP ONE
                        Relax! This should be fun. This step will be used during the making and processing of all cheeses. You MUST do it every time you make cheese! It is not a bad idea to do this 2 to 3 times a week no matter what you are cooking just to keep germs down to a minimum.
                        Wash all work surfaces of your kitchen with your normal soap and water to remove any spills or loose debris left behind from normal use. Sanitize all of your work surfaces using a mixture of 1 gallon of water with 1 tablespoon of beach.

                        STEP TWO
                        Take your milk out of the refrigerator about one hour before making cheese this will save time in heating later. If you didn’t have time for this step, don’t worry – it will just take a few minutes longer to bring the milk up to temperature.

                        Do not submerge thermometers dials or digital readouts! Only the probe goes into the water. If you submerge the entire thermometer you could ruin it.
                        Wash and sterilize all your tools, colanders, moulds, cloths and other items used for making or touching your cheese, then carefully place them on a sterile plate to cool before using. Be careful not to burn yourself! Wear heavy rubber gloves and use all precautions when working with boiling water. If you have a dishwasher this should be sufficient.

                        I keep a small container of sanitizer handy to use during the cheese making process. Every time I use a spoon, whisk, knife or thermometer, I wipe it with a paper towel, rinse it in the sink and throw it back in the sanitizer ready to be used again later. Just tap it on the edge of the sink and wipe it off with a clean paper towel before use. I prefer to use One Step Sanitizer for this purpose. It is a no rinse sanitizer that does not affect the cheese. Rinse your tools in clean water thendip i the sanitizer between uses, then just wipe them on a clean paper towel before using them.

                        NOTE: I highly recommend you carefully read all of the directions in advance so there will be no surprises later on.

                        Now that you have everything clean and organized we are ready to make our first cheese!
                        Smokers:
                        ECB -The Brinkman All-In-One Bullet type Water smoker aka -Baby Bink)Camp Chef Smoke Vault 24 Inch propane smoke (aka -Black Beauty)
                        SunJoy horizontal with left side firebox (aka - Lefty Lucy)
                        River Grille - Black Ceramic Egg (aka Black Egg)

                        Smoke preference:Combination of Charcoal, Hickory, Apple, Cherry & Pecan wood.

                        Comment


                        • #13
                          This is Awesome Deb thanks I may have to try this again the first time did not work out so well so I gave it up thank you again


                          Happyness is a full smoker

                          Comment


                          • #14
                            Bocconcini and Scamorza Affumicata

                            Bocconcini and Scamorza Affumicata (pasta fileta type cheese)

                            Bocconcini [bohk-kohn-CHEE-nee] means small mouthfuls in Italian. They are bite-sized balls of fresh mozzarella. Bocconcini are mild in flavor and have a barely perceptible hint of salt unlike most cheeses. Bocconcini are generally sold packed in whey or water in little tubs in grocery stores.

                            Scamorza is another form of mozzarella but aged for a few days. It is normally pear shaped with a short neck and hung by a string. When fresh it’s called Scamorza Bianca but when smoked it’s called Scamorza Affumicata.

                            As both of these cheeses are made the same way you only needed to change the shape and aging time to make two distinct varieties of cheese. I didn’t change shape just made them all the same way – little balls.

                            This is a low temperature cheese so a pot a sink of water is all you need. Simple!


                            You bring the milk up to 104°F and add a thermophillic culture (could be buttermilk, I used TA-61) and mix well. Then add the rennet and wait an hour. After an the curds are cut into 1 inch cubes diagonally and left alone again for about 30 minutes to firm up. If you have a pH meter the pH should be about 6.5 - 6.6.


                            Keeping the curds at 104°F gently stirred for about an hour. Over stirring will make a tough cheese so be gentle and just keep the curds from sticking for now.

                            After an hour drain and save the whey from the curds and maintain the 104°F as you drain. Add 1 gallon of 104°F tap water to the curds, stir gently and Flip the curds after about 15 minutes to get them to fuse together.


                            Drain the curds into a cheese cloth lined colander. The pH should be about 6.1 - 6.2.


                            Place the curds in a bowl and let them sit over night to develop to the proper acidity.
                            Next morning remove the cheese cloth. The pH should be about 5.0-5.4

                            Heat about 1 gallon of whey with about ½ cup of kosher salt or sea salt to 170°F. While the water is heat cut the curds into large chunks or strips.


                            Test to see if the curds are ready by taking a small piece of curd and placing it in the heated Whey. I just use a bowl of water heated in the microwave to do a quick check.


                            Let it sit for a minute and stir with a fork. When the curds are ready they will stretch and fold and not break. If they are brittle wait the curds are not ready for working yet. Chances are if you waited over night they will be ready.

                            They should stretch like this, in long strings.


                            Now that you know the curds are ready add some of the chunks to the hot water and get ready to stretch the curds.


                            Pull and fold the curds until you get a nice shiny mozzarella looking ball then throw the ball into a bowl of ice water to firm the balls.


                            When done dry the balls with paper towels and refrigerate until use. I made some balls and some strings.


                            I also decided to smoke some of the balls and all of the strings.

                            Along with some Port cheddar, Bitto and Havarti with dill – still smoking
                            Smokers:
                            ECB -The Brinkman All-In-One Bullet type Water smoker aka -Baby Bink)Camp Chef Smoke Vault 24 Inch propane smoke (aka -Black Beauty)
                            SunJoy horizontal with left side firebox (aka - Lefty Lucy)
                            River Grille - Black Ceramic Egg (aka Black Egg)

                            Smoke preference:Combination of Charcoal, Hickory, Apple, Cherry & Pecan wood.

                            Comment


                            • #15
                              Bocconcini the recipe and step by step procedure

                              Bocconcini Like small balls of mozzarella

                              Ingredients:
                              1 gallons milk
                              1/4 teaspoon Thermophilic Type C Culture or 3 tablesppon home therophilic culture
                              Rennet per manufacturers instructions

                              Procedure:
                              Bring milk to a setting temp of 104°F, add starter and mix in well. Add rennet and also mix in well. Allow to set for around 50-60mins. Ph 6.5 - 6.6

                              Cut curds into 1 inch cubes and stand for 30 mins before stirring.

                              Stir very gently over the next 60 mins. The stirring will determine the softness of the cheese. Over stirring = will produce overly firm cheese.

                              Drain off the whey. pH 6.1 - 6.2

                              Keep curd at 104°F to cause it to fuse together. Turn the curd every 15 mins to keep is warm, draining the whey at the same time.

                              After about 1 hour test the curd to see whether it is ready for stretching by placing a piece in 160°F water. When curd is warm, take out and work with fingures, stretching the cheese. It is is brittle and breaks, it is not ready. pH 5.0-5.4

                              When curd is ready, cut into thin strips and place into hot water 160°F. Work the curd stretching it until all the curd has been worked. Over working the curd will toughen it, as will over hot water.

                              Shape the cheese by squeezing between your thumb and forefinger and pinch off ball of cheese formed.

                              Place in ice cold boiled water to set. A little salt can be added, but the salt should not be tasted in the final product.

                              This cheese can be eaten immediately or stored up to a week in the fridge. It can also be marinated in a herbed oil bath.
                              Smokers:
                              ECB -The Brinkman All-In-One Bullet type Water smoker aka -Baby Bink)Camp Chef Smoke Vault 24 Inch propane smoke (aka -Black Beauty)
                              SunJoy horizontal with left side firebox (aka - Lefty Lucy)
                              River Grille - Black Ceramic Egg (aka Black Egg)

                              Smoke preference:Combination of Charcoal, Hickory, Apple, Cherry & Pecan wood.

                              Comment

                              Working...
                              X