 Tweet
Tweet
Canning meat is a great way to preserve and store meat without taking up valuable freezer space. As long as the seal is intact, I have stored canned meat for 2+ years. Although consumption within 6 month is recommended. Poultry, red meat, game, and seafood can all be safely canned. Meat is also considered to be low-acid foods and must be processed in a pressure canner to assure it's safety.
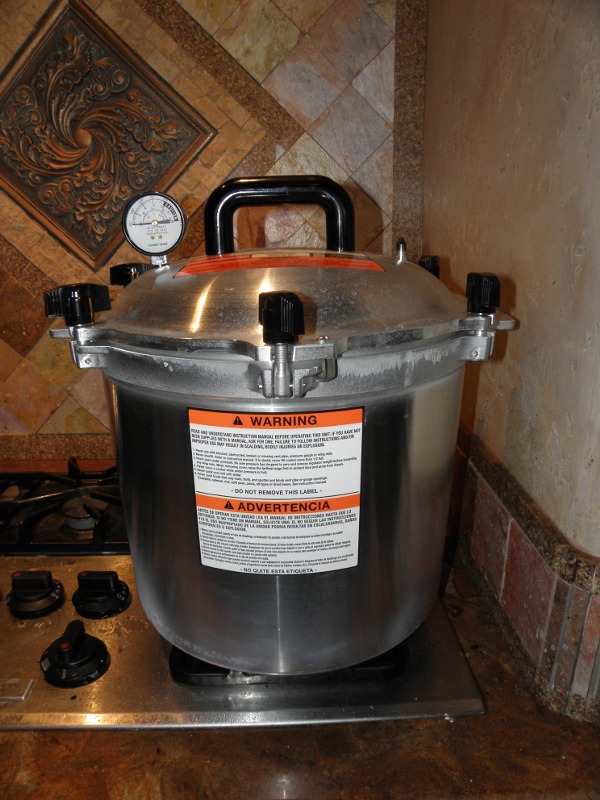
To can meat you will need some specialized tools. There are a few companies that make canning kits. Search your favorite on-line retailer or check out the canning section of your local supermarket or WallyWorld. Pressure canners come in a few sizes and styles and the price range can vary a lot. A recent search online shows small thin walled pressure canner start around $70 and can go up to the $400 range for very large aluminum canners. Also know the elevation of your cooking location. It is not recommended to can meat above 8000 feet.
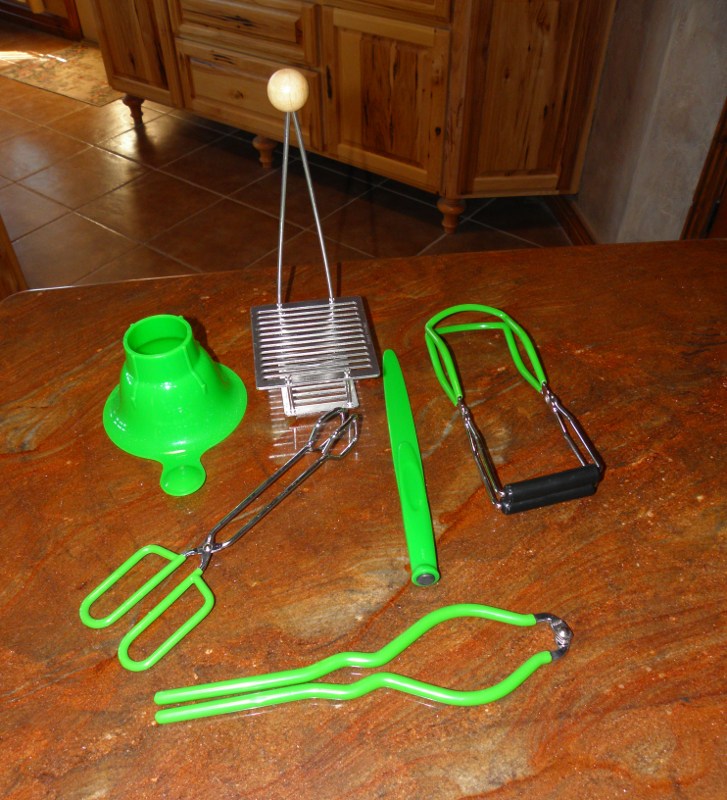
You will also need canning jars, lids, rings, something to grab the hot jars out of the pressure canner, and of course some meat and seasonings. Here is a Presto kit I bought on Amazon a few years ago.
I have successfully canned beef, chicken, elk, and deer. In this rendition, I will be canning some boneless skinless chicken breasts, as well as some beef eye of round.

First run your jars through the sterilize cycle of the dishwasher. This should remove any nasties that could come back to haunt you when you consume your canned vittles.
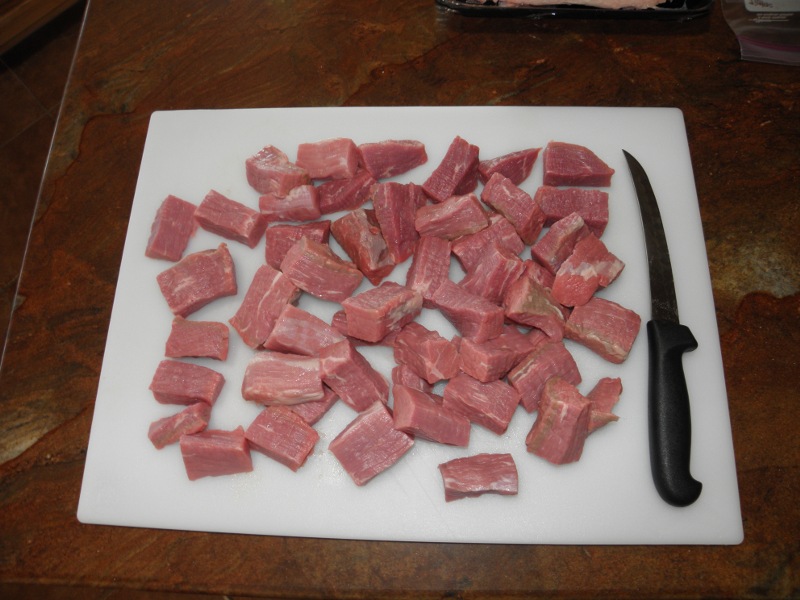
Next prep the meat. Trim the excess fat off of the meat as it�s the first to go rancid. I cut the meat into cubes about 1.5�-2�. It is big enough to make decent sized chunks or longer stranded �pulled� meat once it�s reheated for a meal.
You next have to decide which type of canning you want to do, hot pack or raw pack. Hot pack means you need to precook meat until rare by roasting, stewing or browning in a small amount of fat. Fill jars with pieces and add boiling broth, meat drippings and water or tomato juice, leaving 1 inch of head space. Raw pack means you fill jars with raw meat pieces, leaving 1 inch of head space. Do not add any liquid to the jars. With either method, the meat chunks should be firmly packed but not crushed in the jar. Use a spatula handle or plastic knife to move the meat around to get the air bubbles out.
So I decided to cold pack my chicken and beef this time. I typically can pints or pint-and-a-half jars. It is a better sized for one meal for just the two of us. If you have more mouths to feed, look at processing quart sized jars. Now is the time to prep the lids. I use a canning lid rack as seen in the above picture to soak the lids in hot (not boiling) water until I am ready for them.
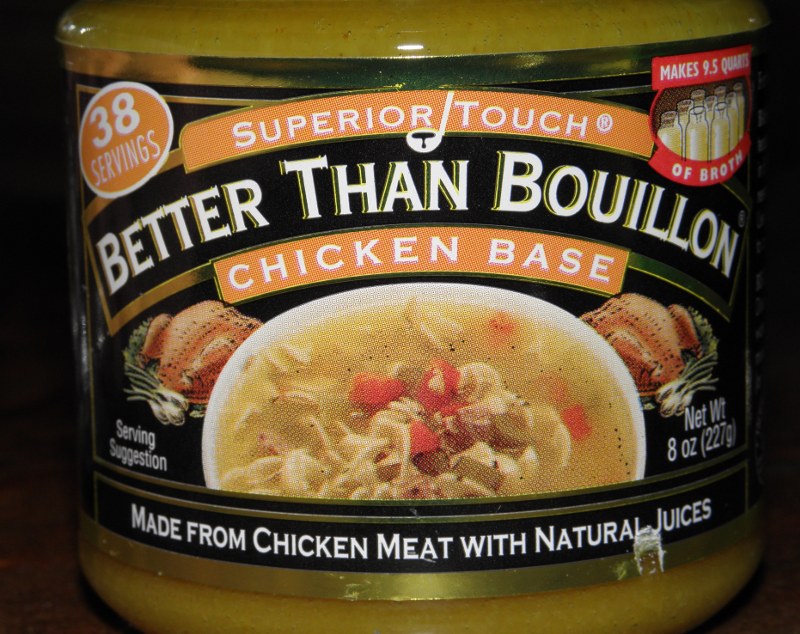
I add a � tsp of Better than Bullion to the beef and chicken jars before packing with the meat. I have tried garlic powder and onion powder in the past, and I prefer to season the meat while reheating. Do not use iodized salt in your canning jars as it will leave a metallic taste to the end product. Again, do not add any liquid to the jars. They will form their own juices. Here is the chicken version of Better than Bullion.
Pack each of the jars until you have 1" of headspace (empty space) for fluid expansion. If you pack too much in it can overflow and contaminate your seal. Use a non metallic blade to run down the sides to remove any air pockets that may form. You want the meat to be placed closely together but not squished into the jars.
Be sure to wipe the rim of the jars with a damp towel to be sure nothing will inhibit a good seal and place a lid on top of the jar. Add a lid ring and barely make it finger tight. This is not the time to torque the lid down. Here are my chicken and beef jars ready to go into the canner.

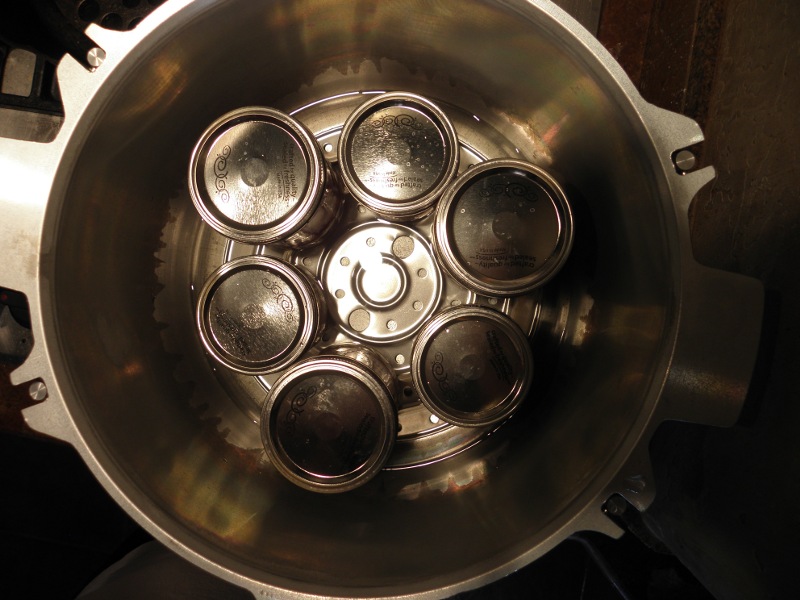
I staggered the jars alternating between the pint and 1.5 pint jars. I added some hot (again not boiling) water of about 140� to the canner until the pints are half way submerged.
Now, turn on the heat and add the lid and crank down the clamps until the gap is similar all the way around. It will take a while for the water to boil.
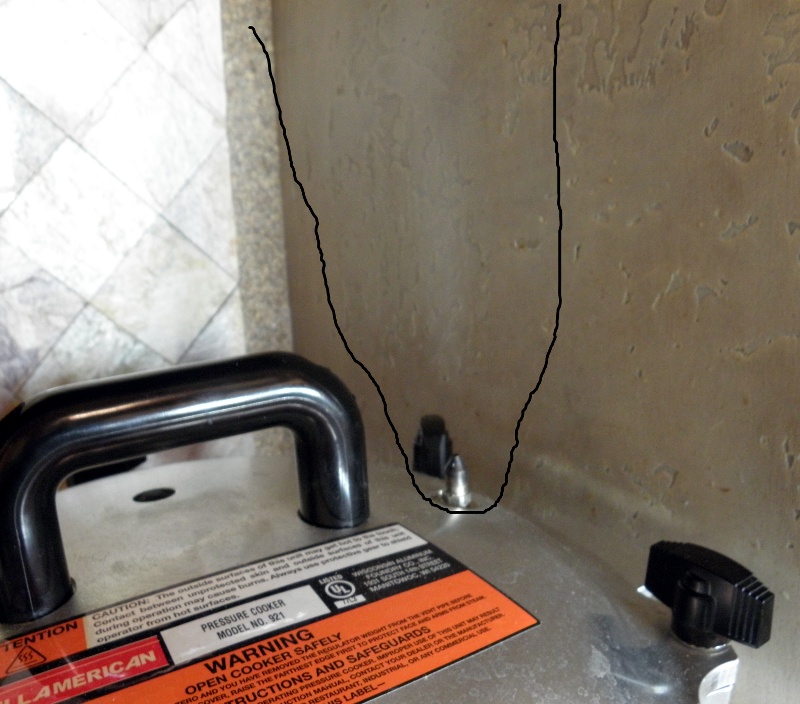
Once steam freely flows out of the nozzle start your timer for 10 minutes to purge the air inside the canner before placing the weight on the nozzle.
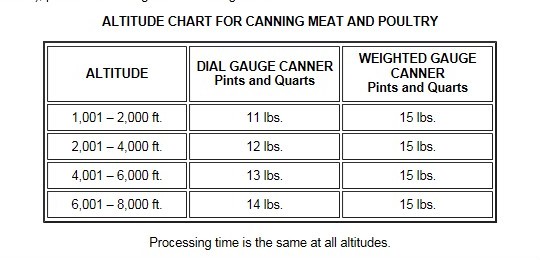
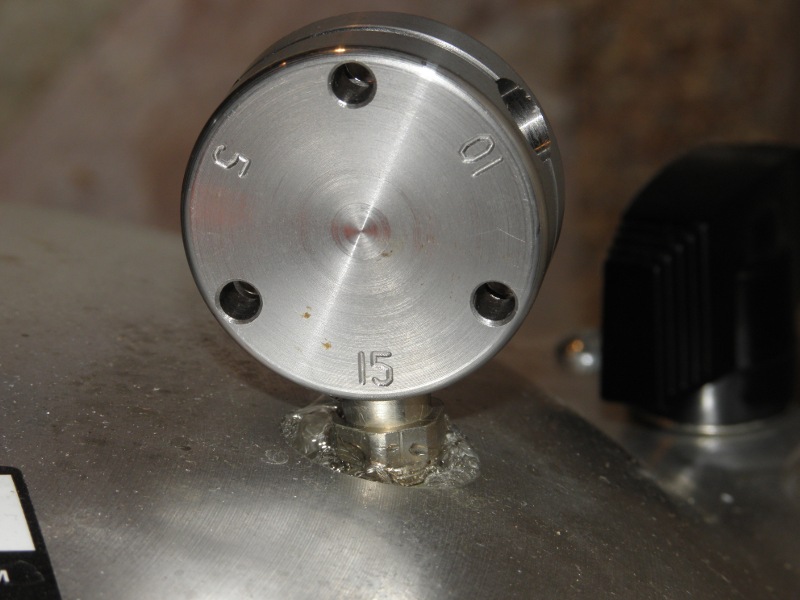
Ok, my timer has went off and now I can add the weight/buzzer to the nozzle. Set the weight with the value that coincides with your elevation on the bottom. Since I live at 4000' I need 15 psi.
Watch the gauge as the pressure rises. It may or may not equal what the weight tells you but it will be within a couple pounds. Once it is to pressure the weight will act like a pressure valve and release pressure. It rattles when this happens and makes a buzzing/ringing sound. Once the weight buzzes set your timer for 75 minutes for pints or 90 minutes for quarts. You can now turn the heat down to maintain pressure and the weight should buzz about 2x per minute.
Once the timer has gone off indicating the canned meat is done, you need to shut off the heat. If you can lift the canner off of the heat, do so carefully. You don't want the jars to tip over. The pressure will go down while the canner cools off. Do not force the cool down or remove the weight pressure valve until the pressure no longer reads on the gauge.
Once the gauge is at zero, it is safe to remove the weight. Caution, it will be hot. I use pliers to remove the weight and put it in the sink to finish cooling off. Once the weight is safely off it is time to loosen the lid. Be careful as the steam is very hot and can burn you.
Use the jar tongs to grab the jars below the rings and gently lift them out of the canner and place on the counter to finish cooling. Usually the seal has not set by this point so be careful not to tip the jars as you can contaminate the seals. Set the jars on a counter away from drafts and let them cool down slowly. You will begin to hear pops as the vacuum pulls down the center of the lids indicating they are sealed. Usually they are completely sealed within an hour or so. If you have jars that do not seal, you do have a couple options:
1. Re-clean the seal and rerun the unsealed jars through another canning cycle.
2. Consume within a day or so.
Once all of the jars are sealed, you can tighten the rings to keep the lids on tightly. It is also good process to label them with the contents and the date. Store the jars in a safe place to be enjoyed at a later date.
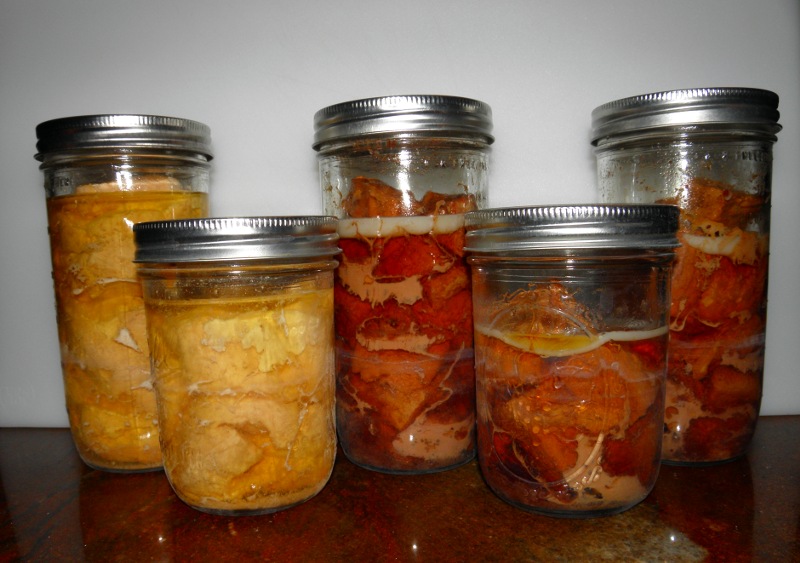
Here is the end result. The jars have cooled down, the lids have properly sealed, and the jars are ready for labels and storage. You can see how much liquid came out of the chicken. The beef is a tad drier but still going to be moist when reheated and it makes a superb gravy. Which brings up another point, do not use any flour in the canning process. The flour acts as an insulator and can prevent the heat from penetrating the meat thoroughly. Wait until you reheat the product to make the gravy.
Hope ya'll find this helpful.
To can meat you will need some specialized tools. There are a few companies that make canning kits. Search your favorite on-line retailer or check out the canning section of your local supermarket or WallyWorld. Pressure canners come in a few sizes and styles and the price range can vary a lot. A recent search online shows small thin walled pressure canner start around $70 and can go up to the $400 range for very large aluminum canners. Also know the elevation of your cooking location. It is not recommended to can meat above 8000 feet.
You will also need canning jars, lids, rings, something to grab the hot jars out of the pressure canner, and of course some meat and seasonings. Here is a Presto kit I bought on Amazon a few years ago.
I have successfully canned beef, chicken, elk, and deer. In this rendition, I will be canning some boneless skinless chicken breasts, as well as some beef eye of round.
First run your jars through the sterilize cycle of the dishwasher. This should remove any nasties that could come back to haunt you when you consume your canned vittles.
Next prep the meat. Trim the excess fat off of the meat as it�s the first to go rancid. I cut the meat into cubes about 1.5�-2�. It is big enough to make decent sized chunks or longer stranded �pulled� meat once it�s reheated for a meal.
You next have to decide which type of canning you want to do, hot pack or raw pack. Hot pack means you need to precook meat until rare by roasting, stewing or browning in a small amount of fat. Fill jars with pieces and add boiling broth, meat drippings and water or tomato juice, leaving 1 inch of head space. Raw pack means you fill jars with raw meat pieces, leaving 1 inch of head space. Do not add any liquid to the jars. With either method, the meat chunks should be firmly packed but not crushed in the jar. Use a spatula handle or plastic knife to move the meat around to get the air bubbles out.
So I decided to cold pack my chicken and beef this time. I typically can pints or pint-and-a-half jars. It is a better sized for one meal for just the two of us. If you have more mouths to feed, look at processing quart sized jars. Now is the time to prep the lids. I use a canning lid rack as seen in the above picture to soak the lids in hot (not boiling) water until I am ready for them.
I add a � tsp of Better than Bullion to the beef and chicken jars before packing with the meat. I have tried garlic powder and onion powder in the past, and I prefer to season the meat while reheating. Do not use iodized salt in your canning jars as it will leave a metallic taste to the end product. Again, do not add any liquid to the jars. They will form their own juices. Here is the chicken version of Better than Bullion.
Pack each of the jars until you have 1" of headspace (empty space) for fluid expansion. If you pack too much in it can overflow and contaminate your seal. Use a non metallic blade to run down the sides to remove any air pockets that may form. You want the meat to be placed closely together but not squished into the jars.
Be sure to wipe the rim of the jars with a damp towel to be sure nothing will inhibit a good seal and place a lid on top of the jar. Add a lid ring and barely make it finger tight. This is not the time to torque the lid down. Here are my chicken and beef jars ready to go into the canner.
I staggered the jars alternating between the pint and 1.5 pint jars. I added some hot (again not boiling) water of about 140� to the canner until the pints are half way submerged.
Now, turn on the heat and add the lid and crank down the clamps until the gap is similar all the way around. It will take a while for the water to boil.
Once steam freely flows out of the nozzle start your timer for 10 minutes to purge the air inside the canner before placing the weight on the nozzle.
Ok, my timer has went off and now I can add the weight/buzzer to the nozzle. Set the weight with the value that coincides with your elevation on the bottom. Since I live at 4000' I need 15 psi.
Watch the gauge as the pressure rises. It may or may not equal what the weight tells you but it will be within a couple pounds. Once it is to pressure the weight will act like a pressure valve and release pressure. It rattles when this happens and makes a buzzing/ringing sound. Once the weight buzzes set your timer for 75 minutes for pints or 90 minutes for quarts. You can now turn the heat down to maintain pressure and the weight should buzz about 2x per minute.
Once the timer has gone off indicating the canned meat is done, you need to shut off the heat. If you can lift the canner off of the heat, do so carefully. You don't want the jars to tip over. The pressure will go down while the canner cools off. Do not force the cool down or remove the weight pressure valve until the pressure no longer reads on the gauge.
Once the gauge is at zero, it is safe to remove the weight. Caution, it will be hot. I use pliers to remove the weight and put it in the sink to finish cooling off. Once the weight is safely off it is time to loosen the lid. Be careful as the steam is very hot and can burn you.
Use the jar tongs to grab the jars below the rings and gently lift them out of the canner and place on the counter to finish cooling. Usually the seal has not set by this point so be careful not to tip the jars as you can contaminate the seals. Set the jars on a counter away from drafts and let them cool down slowly. You will begin to hear pops as the vacuum pulls down the center of the lids indicating they are sealed. Usually they are completely sealed within an hour or so. If you have jars that do not seal, you do have a couple options:
1. Re-clean the seal and rerun the unsealed jars through another canning cycle.
2. Consume within a day or so.
Once all of the jars are sealed, you can tighten the rings to keep the lids on tightly. It is also good process to label them with the contents and the date. Store the jars in a safe place to be enjoyed at a later date.
Here is the end result. The jars have cooled down, the lids have properly sealed, and the jars are ready for labels and storage. You can see how much liquid came out of the chicken. The beef is a tad drier but still going to be moist when reheated and it makes a superb gravy. Which brings up another point, do not use any flour in the canning process. The flour acts as an insulator and can prevent the heat from penetrating the meat thoroughly. Wait until you reheat the product to make the gravy.
Hope ya'll find this helpful.


Comment